Introduction

The Akszon LED Skaut project creates a wall-mounted LED display that shows current blood glucose levels from your Nightscout server. It's a simple way to have glucose information always visible at home – without having to reach for your phone or smartwatch.
Important!
IF NECESSARY, EVEN TWO OR THREE TIMES
Disclaimer
Do Not Test on Humans!
This display is NOT a medical device!
Do NOT use its readings for therapeutic decisions!
This project is a DIY (Do It Yourself) hobby project designed for educational and experimental purposes in the diabetes technology community.
- Not for therapy: The displayed information is delayed (by several to over a dozen minutes from actual blood glucose) and may have significant errors.
- Check with a glucometer first: Before administering insulin for high glucose or treating hypoglycemia, ALWAYS verify your glucose level with a fingerstick glucometer!
- No medical approval: This device is not certified as a medical device, does not meet medical standards, and is not covered by any warranty or insurance policy.
- Use at your own risk: By building, programming, and using this display, you assume full responsibility for all consequences, including potential health risks resulting from incorrect therapy decisions.
- Not a substitute for medical advice: This device does not replace consultation with your doctor or diabetes educator. Always follow your healthcare provider's recommendations.
If you do not agree to these terms, please do not use this device. Your health and safety depend on conscious decisions and responsible use of technology.
The project is provided "as is" without any warranty. The author is not liable for any damages resulting from its use.
This Could End Badly!
This tutorial is for educational purposes - it presents an example of configuration possibilities prepared by the author, but it is not an official instruction and should not be treated as such. The tutorial may contain errors or significant omissions and assumes a certain level of professional and technical knowledge from the reader. The author takes no responsibility for the consequences of imitating the described processes or the results of following this tutorial - you act at your own will and risk!
Fine Print...
Unless otherwise stated, all copyrights to the described materials belong to the author. Before distributing, ask the author for permission!
In My Humble Opinion...
The expressed opinions belong solely to the author and are not the official position of the Diabetes Technology group, mentioned open source projects, service providers, or third-party companies. Trademarks and brand names were used solely for educational purposes.
What IS This Tutorial About
This project aims to build a cheap (~10 zł) controller - firmware for popular boards from the ESP32 family - that will control the LED panel to display data from Nightscout.
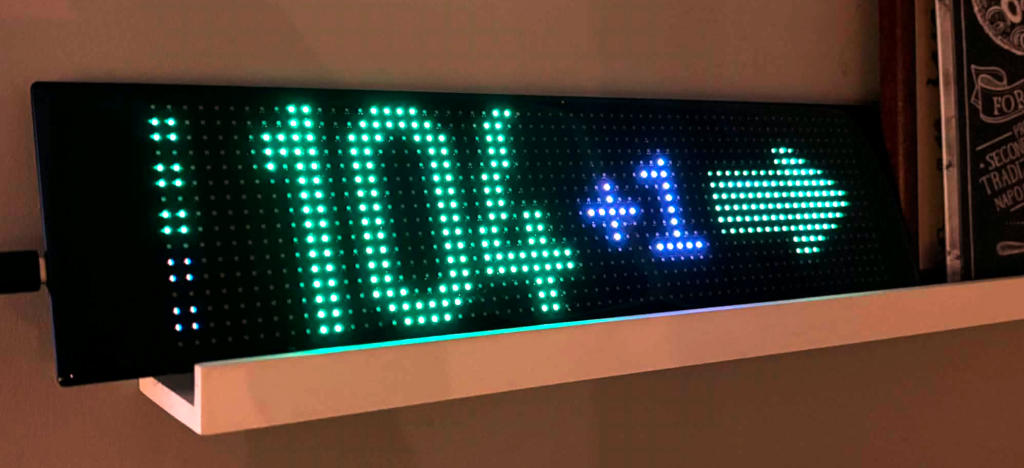
LED Panel in this case refers to a series of relatively cheap colored LED panels. You can purchase their branded version at Action stores (for about 86 zł), but it's based on popular panels that can be ordered from AliExpress (priced 50-80 zł). The panel is built from colored (RGB) LEDs and has a resolution of 16x64 (although other variants exist, support for which we'll add later). The panel is originally controlled via a dedicated mobile phone application that communicates with it via Bluetooth.
Nightscout is a www server (website) that collects and presents glucose data and other important parameters of diabetes therapy in type 1 diabetes. Thanks to Nightscout, you can easily share and analyze your glucose. Nightscout also connects many applications from the diabetes tools ecosystem.
This documentation contains detailed instructions for:
- Purchasing the necessary electronic components
- Installing firmware on the ESP32 controller
- Configuring the device (WiFi, Nightscout, LED settings)
- Updating the controller software via OTA
- Using and troubleshooting common issues
What This Tutorial is NOT About
This tutorial is NOT about:
- What Nightscout or Android APS loop is
- How to configure Nightscout for specific needs
- How to make Nightscout or the panel read glucose "by itself" or from a CGM/FGM sensor
Training and Tutorials
This tutorial is sometimes quite technical, designed as tool documentation.
If you're a layman, guides and webinars on the Diabetes Technology group may be more accessible for you.
What You Need to Do
Let's start with the fact that this is not a finished product, I am not its manufacturer. This is an instruction on how to independently assemble parts and build such a panel from ready-made blocks.
A few simple steps will be required:
- Purchase the right LED panel
- Purchase controller board
- Upload firmware to the controller
- Configure the controller to see our WiFi and have access to our Nightscout
On the other hand:
- Components are relatively cheap - you can fit within 120 zł, alternatives are usually 2x more expensive
- No soldering or programming required - you use ready-made devices, I made the software

What You Need to Know / Be Able to Do
- Be able to find and buy the right product on a store shelf or/and in an online store
- Know access credentials to Nightscout and home WiFi
- Read with comprehension and maintain focus
For each of these cases, if they turn out to be needed - I'll provide details and show in screenshots how to do it
What You Need to Have
 Working and configured Nightscout server
- Stable access to WiFi network, preferably your own home network
 PC-class computer (Windows, MacOS or Linux) with internet access and an installed web browser
I recommend using Chrome, but current Chromium, Firefox, Opera or Safari will probably work too. I don't recommend Internet Explorer or Edge.
 Some time and peace - it's best to start on Saturday morning without pressure that the panel must be working "yesterday"
 Coffee, patience, and positive attitude - it's not that difficult and it will definitely work!
Legend and Conventions
In this tutorial I will use several conventions to mark actions - or places in screenshots - that deserve attention:


 - colored references in text refer to rounded frames/markings in the same color on the screenshot
 - "grayed out" areas on screenshots are censorship to hide irrelevant fragments (and hide author's configuration details)
Authors
- The author of this tutorial and firmware is Dominik Dzienia
- Tomek "Słodka Olga" was the first tester of the solution
Hi! I'm Dominik - the creator of this project.
I'm involved in diabetes technology as both a patient (type 1 diabetes) and an IT professional. I believe accessible technology can significantly improve the lives of people with diabetes.
This project is free and open-source. I'm sharing it with the community in the spirit of mutual support that defines the DIY diabetes technology movement.
If you want to support the project:
- Share it with others who might find it useful
- Report bugs and suggest improvements
- Join the discussion on Diabetes Technology (Polish) Facebook group
- Support financially (details on the group)
Found a bug or have a suggestion about the tutorial...
If you found a typo, factual error, or have an idea how to improve this tutorial - write directly to the author on Messenger or send an email
Have questions about your installation...
As a rule, I don't help in private messages - I want your problem and its solution to help other users. Therefore, I encourage you to first contact me and other Panel users on the Diabetes Technology group - using the search function and looking for similar questions and problem solutions, or creating a post with a detailed description of the problem.
Let's get started! Head to the Shopping Guide to see what parts you'll need.